Flute – A Melodic Embroidery Design for Craft Fair Success
When I first opened the Flute machine embroidery design, I felt a quiet sense of refinement. This is not a loud, novelty-heavy pattern. It is an elegant, music-themed piece that leans into a premium and sophisticated aesthetic. The flute, as a woodwind instrument, carries a graceful silhouette that translates beautifully into stitched form. As an experienced embroidery designer who has prepped hundreds of designs for craft fair booths, I can tell you that Flute has real potential—but only if you match it to the right products and prepare it with care.
Let me walk through how this design performs in real-world selling scenarios, what you need to watch out for during production, and how to make it stand out in a crowded handmade market.
First Impressions: The Mood and Appeal of Flute
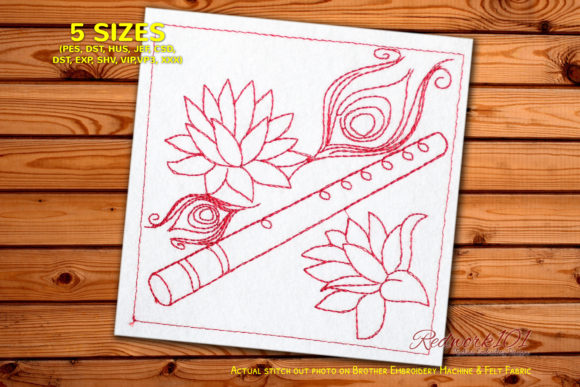
Flute reads as classic, graceful, and slightly refined. It is not a cute cartoon instrument, nor is it overly rustic or farmhouse. It sits somewhere between modern minimalist and decorative elegant. The optional Box Stitch adds a structured framing element that can make the design feel more finished and intentional. If you choose to use the outer box, note that the color of the box can be customized independently from the flute itself. This gives you flexibility to match seasonal palettes or brand colors.
For a craft fair customer, Flute communicates a love of music, artistry, and detail. It appeals to music teachers, flute players, parents of young musicians, and anyone who appreciates a clean, professional look. If you are targeting Etsy seller audiences or building a cohesive Music collection for your shop, this design fits naturally.
Tote Bags and Market Bags
Flute shines on a tote bag design. The vertical orientation of the instrument works well on the front panel of a standard tote. I recommend hooping a medium-weight cotton or canvas tote and centering the flute at chest height. The Box Stitch, if used, creates a clean border that draws the eye. Customers browsing a booth will notice the silhouette immediately. It photographs well for online listings because the shape is recognizable even at a glance.
Apron Embroidery
On an apron embroidery piece, Flute works best as a chest or bib placement. The long, narrow profile of the flute fits the vertical space of an apron bib naturally. This is a strong product for music teachers who work with students and want a professional yet personal touch. Use a lighter thread color on darker aprons to make the instrument pop.
Tea Towel Embroidery
For tea towel embroidery, Flute can be positioned as a centered motif or a smaller accent near the hem. Towels are a popular craft fair product because they are affordable and easy to produce in batches. The design remains clear at moderate sizes, but be careful about stitch density on textured towels. Linen or cotton flat-weave towels work best.
Embroidered Patches
Flute translates well into an embroidered patch format. Patches are a high-margin, low-inventory product that customers love to collect. The Box Stitch can serve as a natural border for the patch edge. Keep the size small enough to be wearable but large enough to retain detail. Flute as a patch is a great add-on item at your booth.
Caps and Hats
This is where Flute requires caution. The curved surface of a cap means you need to test the design on a scrap cap first. The flute's long, straight shape may not align perfectly with the curve of a cap front. If you plan to offer cap embroidery, consider reducing the design size or positioning it slightly off-center to avoid distortion. I would only recommend this for experienced embroiderers with a cap hoop.
Pillow Covers and Fabric Pouches
Flute on a pillow cover or small shop product like a fabric pouch feels gift-ready. A small pouch with a flute motif makes a lovely accessory for a music student or teacher. Pillow covers can be stitched as display pieces in your booth, showing the design in a home setting. The handmade product quality here feels elevated.
Practical Selling and Production Insights
One of the strongest selling points of Flute is how easy it is to understand at a glance. Customers do not need to squint or guess what the design is. That immediate recognition is a huge advantage in a busy craft fair environment. When people walk past your booth, they will register the flute shape quickly, and if they have a connection to music, they will stop.
Flute works both as a small accent and a large focal design. At smaller sizes, keep the Box Stitch minimal or omit it entirely to avoid crowding. At larger sizes, the instrument details become more visible and the design feels more premium. I recommend creating at least one printable mockup for your online listings showing the design on a tote bag and a towel. This helps customers visualize the finished product.
For batch production, Flute is repeatable and consistent. The stitch path is straightforward, and the design does not rely on tricky color changes. If you are producing for a weekend craft fair, you can stitch multiple units in a single session. This is a reliable commercial embroidery design that will not cause unnecessary downtime.
Careful-Use Notes for Professional Results
Before you scale production, pay attention to these details:
- Dense stitch areas: Check the flute body for areas where stitches may pile up. If the design has dense fill regions, use a stabilizer that can handle the weight. A tear-away stabilizer with a medium-weight fabric is a good starting point, but always test first.
- Tiny details: If the flute includes small keys or embellishments, they may disappear at smaller sizes. I recommend testing the design at your intended size on scrap fabric before committing to a batch.
- Small lettering: If you add any text to the design, keep it legible. Do not scale down the flute so much that the instrument details become unclear.
- Thick fabric: On towels or thick cotton, the fabric texture can swallow fine details. Use a sharp needle and a hoop size that keeps the fabric taut.
- Dark fabric: Flute will need a high-contrast thread color on dark backgrounds. White, silver, or a bright metallic thread can make the design pop. Test the thread colors against the fabric before production.
- Curved cap surfaces: As mentioned, caps are tricky. Use a cap frame and a lightweight stabilizer to minimize distortion.
Visual Appeal and Customer Engagement
Flute has a natural elegance that makes customers feel like they are buying something special. It is not a generic design—it shows thought and care. At a craft fair, this translates to longer dwell time at your booth. People will pick up the product, turn it over, and engage with the stitching. The finished product quality is a major selling point.
For booth display strength, I recommend having at least one large sample—a tote bag or apron—front and center. Pair it with a small patch or pouch to show the versatility of the design. This creates a brand consistency that signals to customers that you are a professional embroiderer with a curated collection.
Flute also works well as part of a Music series. If you have other instrument designs, group them together on your table. Customers who are looking for a gift for a musician will appreciate the cohesive set. This is a smart way to increase average order value.
Embroidery Designer’s Checklist Before Production
Before you stitch Flute on any final product, run through this checklist:
- Test the design on scrap fabric at your intended size and hoop size. Check for any puckering, detail loss, or thread breaks.
- Check thread contrast against your fabric. The flute shape should be immediately readable from a few feet away.
- Review spacing around the design. Leave enough margin for the Box Stitch if you plan to use it.
- Confirm hoop size is appropriate for the design dimensions. Do not force the design into a hoop that is too small.
- Inspect stitch density in the digital embroidery file. If the file feels too dense, consider reducing the stitch count or using a lighter stabilizer.
- Use the right stabilizer for your fabric type. Cut-away stabilizer for stretchy fabrics, tear-away for stable woven fabrics.
- Create at least one real mockup for your online listings. A printable mockup is helpful, but a photo of the actual stitched product builds trust.
- Compare fabric colors to your thread palette. Make sure the flute reads clearly against the background.
- Confirm commercial licensing before selling finished products. Check the terms of the embroidery file to ensure you have the right to sell items made from it.
- Stitch a test sample on the exact product you plan to sell. This is the only way to be sure of the final result.
Final Verdict: Is Flute Ready for Your Booth?
Flute is a strong addition to any machine embroidery design collection aimed at craft fair and handmade market sellers. It offers a premium, elegant look that appeals to a specific but passionate audience. The optional Box Stitch gives you creative control, and the design itself is versatile enough to work on tote bags, aprons, towels, patches, and pouches.
With proper preparation, testing, and attention to stitch density and fabric texture, Flute can become a reliable product in your booth. It will attract music lovers, teachers, and gift shoppers who appreciate quality craftsmanship. For the handmade product market, this design holds its own.
If you are an Etsy seller or a small shop product creator looking to expand your Music category, Flute deserves a spot in your rotation. Just remember to check your hoop size, stabilizer, and thread colors before you start production. And as always, stitch one for yourself first—you will be glad you did.